 Save
Save I'll never forget the afternoon my grandmother pulled out a faded photograph of her own mother's quilting circle from the 1950s. As she traced her finger over the intricate patchwork pattern, she said, "Wouldn't it be lovely if we could eat something this beautiful?" That comment stuck with me for years, until one rainy Sunday in my kitchen, inspiration struck—what if I could translate that very feeling into cake? The Cozy Quilt Patchwork Cake was born from that memory, a dessert that celebrates both the artistry of quilting and the simple joy of homemade cake.
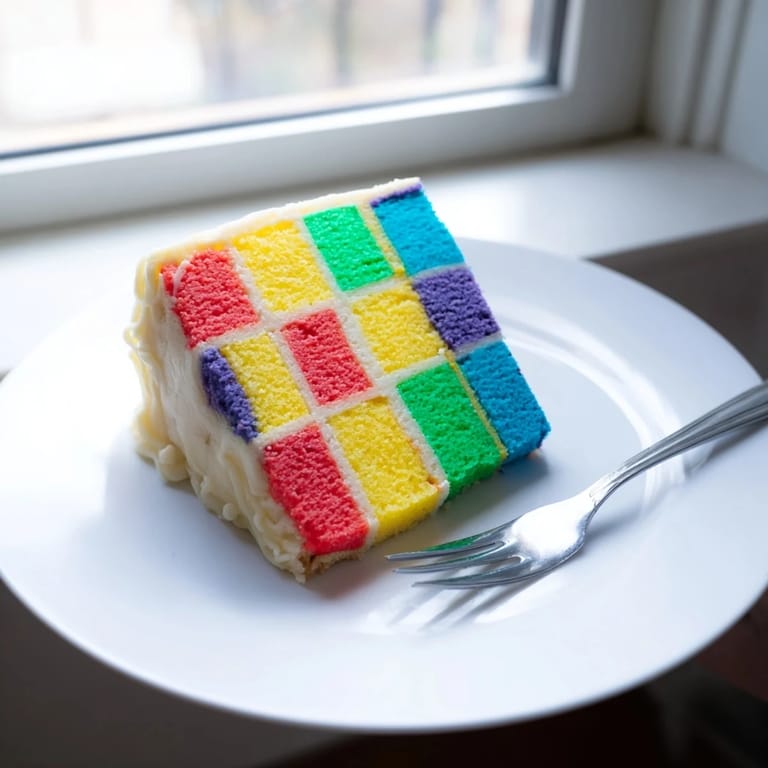
I baked this cake for my neighbor Sarah's milestone birthday last spring. When she walked into the kitchen and saw that vibrant patchwork of reds, yellows, greens, blues, and purples arranged in neat squares, she actually gasped. For a moment, everyone just stood there admiring it before anyone even thought about eating it. That's the magic of this cake—it becomes a moment, a memory, not just a dessert.
Ingredients
- All-purpose flour (350 g): The foundation of your tender crumb; measure by spooning into your cup rather than scooping, which can pack it down and make your cake dry.
- Granulated sugar (300 g): Creates structure and helps your batter become light and fluffy when creamed with butter—don't skip this step.
- Baking powder (2½ tsp): Your lift agent; make sure yours is fresh by checking the expiration date, as old baking powder loses its power.
- Salt (½ tsp): A tiny guardian that makes every other flavor sing without announcing itself.
- Unsalted butter (250 g, softened): Should be soft enough to leave an indent when you press it, but not melting; this is crucial for proper creaming.
- Large eggs (4): Room temperature eggs incorporate more smoothly into your batter, creating a better texture—take them out 30 minutes before baking.
- Whole milk (250 ml): The moistness carrier; whole milk gives richer flavor than low-fat varieties.
- Vanilla extract (2 tsp for cake, 2 tsp for frosting): Use pure vanilla if you can; the difference is subtle but real.
- Food coloring gels (red, yellow, green, blue, purple): Gel colors are your friend here—they're concentrated, so you need less, and they won't thin your batter like liquid food coloring does.
- Unsalted butter for frosting (350 g, softened): This needs to be properly softened and at room temperature, or your buttercream will be lumpy.
- Powdered sugar (500 g): Sift it if it's lumpy, which saves you from grainy frosting.
- Milk for frosting (3–4 tbsp): Add gradually; you're looking for a spreadable consistency that holds its shape.
Tired of Takeout? 🥡
Get 10 meals you can make faster than delivery arrives. Seriously.
One email. No spam. Unsubscribe anytime.
Instructions
- Prepare your workspace:
- Preheat your oven to 180°C (350°F) while you get five square baking pans ready—grease them well and line the bottoms with parchment paper. This step takes just minutes but prevents the heartbreak of cake stuck to the pan. If you only have one or two pans, don't worry; you can bake in batches, letting each cool slightly before baking the next.
- Cream the foundation:
- In a large mixing bowl, beat softened butter and sugar together for 3–4 minutes until the mixture looks pale, fluffy, and almost mousse-like. This is where you're incorporating air into your batter, which creates lift. Then add your eggs one at a time, beating well after each addition so they fully incorporate. Finish with vanilla extract.
- Combine your dry ingredients:
- In a separate bowl, whisk together flour, baking powder, and salt. This distributes the leavening agent evenly throughout, preventing dense pockets in your cake.
- Build the batter:
- Now comes the gentle part—alternate adding your flour mixture and milk to the wet ingredients, starting with flour and ending with flour. Scrape down the bowl between additions and mix only until just combined; overmixing develops gluten, which makes cake tough rather than tender.
- Color your dreams:
- Divide your batter evenly into five bowls. Using gel food coloring, tint each bowl with a different color—red, yellow, green, blue, and purple. I like to use a toothpick to add just a tiny drop first, then fold it in before adding more. This gives you more control than squeezing the entire bottle in at once.
- Bake with patience:
- Pour each colored batter into its prepared pan, spreading gently and evenly. Bake for 20–25 minutes until a toothpick inserted in the center comes out clean or with just a crumb or two. Your kitchen will smell absolutely divine.
- Cool with care:
- Let the cakes cool in their pans for 10 minutes—this helps them set slightly so they don't fall apart when turned out. Then turn them out onto cooling racks and let them cool completely at room temperature. Rushing this step is a common mistake that leads to warm, fragile cake that crumbles when you try to cut it.
- Make your frosting:
- While cakes cool, beat softened butter until creamy and pale. Gradually add sifted powdered sugar, vanilla, and a pinch of salt, beating until fluffy. Add milk a tablespoon at a time until you reach a spreadable consistency—not too stiff, not too soft.
- Cut into squares:
- Once cakes are completely cool, trim off the browned edges with a serrated knife to make neat rectangles, then slice each colored sponge into uniform squares about 3 cm × 3 cm. A ruler helps here if you're feeling precise.
- Arrange the patchwork:
- On a large serving board or cake base, begin arranging your colored squares in an alternating pattern, creating a quilted effect. A thin layer of buttercream between squares acts as glue, holding everything in place. Build layers, alternating colors as you go up—this is where the magic happens and your cake truly becomes a patchwork quilt.
- Frost and finish:
- Apply a thin layer of buttercream to the top and sides, smoothing it gently. If you're feeling artistic, use a piping bag to pipe buttercream lines that enhance the patchwork effect, outlining your squares.
- Chill before serving:
- Refrigerate for 30 minutes to let everything set and stabilize before slicing. This makes cutting cleaner and helps the frosting not smear.
 Save
Save The moment that stays with me isn't actually the baking or even the careful arranging—it's when my friend Marcus took his first bite and said, "This is like eating a hug." He wasn't being flowery; he meant that every element—the softness of the cake, the sweetness of the frosting, the joy of all those colors coming together—just felt like comfort. That's when I realized this recipe isn't really about impressing people with a fancy cake. It's about creating something that tastes as good as it looks, and tastes like you put your heart into it.
The Art of Color in Baking
I've learned that color in baking is about more than just looking pretty. When you're working with gel coloring, a little goes a long way—I usually start with a toothpick's worth and build from there. The colors should be vibrant but not so dark they affect the taste. I once made the blue too intense trying to get that perfect periwinkle, and it tasted slightly bitter. Now I remind myself that the best colors are the ones that enhance the eating experience, not dominate it.
Timing and Temperature Matter
One afternoon, I thought I could save time by using cold milk and cold eggs. The batter looked grainy and separated, and the finished cake was dense and unpleasant. It taught me that baking is one area where you genuinely cannot rush the small details. Everything needs to be at room temperature—not cold, not warm, but that gentle middle ground. It's like the cake is asking you to slow down and pay attention.
Variations and Personal Touches
This recipe is more flexible than it might seem. I've added lemon zest for brightness, almond extract for depth, and even a touch of cardamom for warmth. I've also swapped out regular flour for gluten-free flour with excellent results—just use a 1:1 gluten-free blend. The cake pairs beautifully with fresh berries, a dollop of lightly sweetened whipped cream, or even a simple dusting of powdered sugar if you're keeping it minimal.
- For extra flavor dimension, try adding citrus zest or almond extract to the batter before dividing it into colored portions.
- If baking gluten-free, a 1:1 gluten-free flour blend works seamlessly without any other adjustments.
- Serve with fresh berries or whipped cream to add freshness and cut the richness of the buttercream.
 Save
Save Every time you make this cake, you're creating something beautiful with your own hands. That's worth savoring.
Cooking Guide
- → How do I achieve the vibrant colors in the sponge?
Use gel food coloring gels, which provide bright hues without thinning the batter, ensuring vivid and consistent colors.
- → Can I prepare the cake in advance?
Yes, you can bake and assemble the cake ahead of time. Chill it for at least 30 minutes after frosting to set the buttercream before serving.
- → What is the best way to cut uniform squares?
Trim the edges first for clean lines, then use a serrated knife to slice the sponge into 3x3 cm squares carefully for even patchwork layers.
- → Can I substitute ingredients for dietary needs?
Yes, substitute the all-purpose flour with a 1:1 gluten-free blend for gluten-free versions, and consider alternative milk or butter for other preferences.
- → What tools are essential for assembling the cake?
You'll need square baking pans, an electric mixer, mixing bowls, a spatula, and a piping bag if you wish to create decorative buttercream lines.
- → How should the cake be served for best texture?
Serve after chilling to allow buttercream to firm up, which helps maintain the patchwork structure and enhances the creamy texture.